Quantcast
Channel: Functional Guy- Devendra Gulve
Viewing all 35 articles
Browse latest View live

Accounting flow in Oracle Purchasing

$
0
0
Accounting flow in Oracle Purchasing


Understand ASL Precedence

$
0
0

Understand "Approved Supplier List" (ASL) Precedence


Commodity level ASLs exist primarily for the buyer to be able to exercise control over a supplier’s ability to source. In other words, the buyer can with very little effort block a supplier for an entire commodity. In this exercise, you will learn to understand ASL precedence.


Understand ASL can be defined at different levels and can be have different status at each level.

Below are the levels at which ASL can be defined. (Item Level and Commodity Level)


Below are the status available for Supplier in ASL.


Consider the following scenarios:


Scenario 1

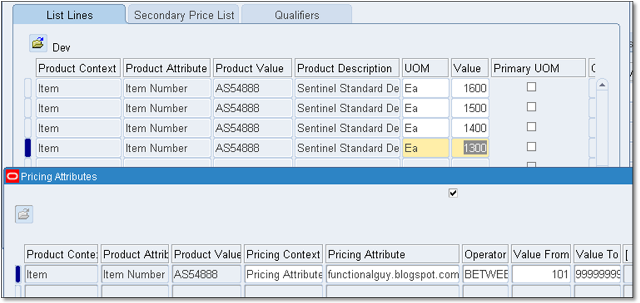
Note: In this scenario IBM and Stargate may supply 17" Flat Panel Monitors. AND can supply all supplies in the Computer.Supplies category. For approvals, as long as there are item level approved suppliers on the list, the category level suppliers are ignored.


Scenario 2

Note: Assuming that the Debarred status is set up to prevent PO approval and sourcing, in this scenario only AND can approve POs for the monitor. IBM and Stargate are still on the ASL, they just can't approve POs or source.


Scenario 3

Note: IBM and Stargate are no longer on the ASL since they are disabled. Status is irrelevant in this situation. AND can approve purchase orders.


Scenario 4

Note: In this scenario no one may approve purchase orders for the monitor. If a supplier is debarred for a category of items,. AND is prevented from approving purchase orders or sourcing for the entire category of items.

Purchasing uses commodity this way to debar suppliers.

Invoicing of PO for over Received quantity

$
0
0


Consider a case below.

If user receives quantity more than ordered quantity but with in the tolerance limit specified on PO, then how invoicing activity is carried out.


  • PO raised of quantity 10 with unit price 100.


  • Over Receipt Tolerance is given as 20% (PO> Shipment > Receiving Controls)


  • At the time of doing receipt user has received quantity of 11.


No we need to focus on invoicing part of this case.


  • Invoice is Raised for 11 quantity of 1100 amount.
  • At the time of matching, Oracle shows order quantity as 10, received quantity as 11.
  • At the time of validating the invoice, Oracle puts hold on this invoice of more amount is invoiced than the PO amount.


  • After release this hold we can process the invoice successfully and also close the PO.


What's new at R12 Purchasing

$
0
0
What’s new in R12- Purchasing:
·The Professional Buyer’s Work Center speeds up daily purchasing tasks by providing buyers with a central launch pad from where they can efficiently perform their daily tasks, such as:
oViewing and acting upon requisition demand
oCreating and managing orders and agreements
oManaging contract deliverables
oRunning negotiation events, including auctions and RFxs
oManaging supplier information
·The Professional Buyer’s Work Center tightly weaves Oracle Purchasing with other products in the procurement family, such as Oracle Sourcing, Oracle Procurement Contracts, and Oracle Services Procurement. Buyers can now easily navigate from purchasing to sourcing documents, and vice-versa, using a single, friendly user interface.
·From the Demand Workbench, buyers can access the catalog and favorites to find negotiated alternatives to non-catalog requests. While authoring orders and agreements, buyers can use the catalog or favorites to quickly add items, thereby accelerating the document creation process. The enhanced catalog access provides easy access to pre-negotiated items. This reduces spending by leveraging negotiated pricing.
·Document Styles is a new feature in R12. It allows buying organizations to control the look and feel of the application to match the needs of different purchasing documents.Through reusable document styles, deploying organizations can enable or disable various Oracle Purchasing features, thereby simplifying the user interface. This helps people to use familiar name to Purchasing documents.
oWhen a purchasing document is created using a style, disabled features are hidden to simplify the user interface. For example, organizations can create a document style for a specific commodity, such as temporary labor. This document style optimizes field labels and display for that commodity, simplifying purchase order entry by hiding regions/attributes that are only relevant for goods purchases.
·Procurement of Complex Services is an integrated solution for Oracle Services Procurement used to model complex work contracts that involve advanced payment terms. These contracts tend to have high dollar values, often running into several millions of dollars. They also tend to be long lead time contracts, sometimes extending over multiple years. These contracts are characterized by progress payments that are governed by the complex payment terms, and which are released based on completion of work.
oThe business flow can originate with a services request which the buying organization determines needs complex payment terms to manage and fulfill. The sourcing process allows negotiation of the complex payment terms and these are carried forward to the Contract after the award.
oThe Contract, once approved and signed off by the involved parties is now in a state ready for execution. The Supplier can report progress on the work specified on the Contract, which the buying organization can certify as complete. Subsequently, payments can be processed for the progress made on the contract. The payment terms specified on the contract are used to compute the payment due to the supplier.
·Public APIs are modified to support Multi-Org Access Controls (MOAC). Public APIs take Operating Unit as a parameter. Operating Unit is an optional parameter. If it is not provided, the default operating unit from setup is used to set the desired context.
oPO Change API – POXCHN1B.pls
oCancel PO API – POXPDCOB.pls
oPrice Control API – POXPCPRB.pls
·Oracle E-Business Tax is a new infrastructure for tax knowledge management and delivery using a global system architecture that is configurable and scalable for adding country specific tax content.
oAs the single point solution for managing transaction-based tax, Oracle E-Business Tax delivers tax services uniformly to Oracle E-Business Suite business flows through one application interface.
oOracle E-Business Tax provides a comprehensive solution to configure, maintain, manage, and access transaction-based taxes. Organizations will have the ability to effectively address multiple tax needs, from global tax requirements to local compliance.
oPreviously, only basic tax code and tax group based tax computation capabilities were supported. By integrating with Oracle E-Business Tax, the Procure to Pay business flow will be able to address complex tax requirements. Another benefit of the integration is the ability to utilize a single point tax solution across the E-Business Suite, which greatly simplifies maintenance and tax management.
oTax is calculated for the following purchase documents:
§Purchase and Internal Requisitions, at the requisition line level
§Standard and Planned Purchase Orders, at the PO shipment level
§Blanket and Scheduled Releases, at the Release shipment level
oTax is calculated whenever a purchase transaction is created and tax is recalculated when any tax determination attributes on the transaction is updated. So any saved purchase document should have its applicable tax already calculated.
oIn case of upgrading to R12 client may opt to keep using Pre-R12 tax setup or can do some additional setups for using new functionalities.
·In release 11i, Oracle Advanced Procurement Suite supported XSL-FO stylesheet based layout templates. In release 12, you can use layout templates created in Microsoft RTF and Adobe PDF formats. With Release 12, buyers can print purchasing documents on demand using any of the pre-defined layout templates. It also allows buyers to print a purchasing document in multiple formats
oAttachment type supported
§Notes to Supplier (R12, 11i)
§Long Short text (R12, 11i)
§Files (R12)
§URL (R12)
·Maintain Sourcing Rules/ASLs for Agreement Items: Prior to this release, system-generated sourcing rules and ASLs were only created at the timeof blanket agreement approval. These rules were enabled for all organizations, which might nothave mirrored actual business processes.
In this release, you create sourcing rules and ASL entries for a specific inventory organization.You can create these rules for agreements that you manually create, or for agreements that youimport through the open interface.
In addition, the dependency of rules creation with the approval process has been removed. Asa result, you can create rules for existing agreements that have already been approved.This concurrent program allows you to automatically create rules for all of the operating unitsin which a blanket agreement is enabled.
o
·Support for Contract Purchasing Users: In this release, contingent workers can perform the same actions as requesters and buyers who are employees. These actions include creating requisitions, purchase orders, and receipts. In addition, contingent workers can approve both requisitions and purchase orders.
Now the question is what the benefit of this:
• Companies can outsource their procurement functions to third parties, allowing them tofocus on their core competencies.
• For the many companies that utilize the services of contingent workers, these workers canraise requisitions on their own behalf.
• Companies can meet compliance requirements because they no longer have to definecontingent workers as employees for contingent workers to perform their jobs.
·Auto-Approval Tolerances for Change Orders: (Purchasing : Tolerances and Routing > Change Order)Auto-Approval Tolerances are defined on Setup screen or in Workflow Attributes.Once a Purchasing Document is submitted for approval, in the Approval Workflow a check isdone to ensure that all changes are within tolerance. If they are then main approval is bypassedotherwise the document is routed through main approval process in workflow.
·Model Complex Pricing for Blanket Line Items: R12, Oracle Purchasing provides an additional option to model complex pricingfor Blanket line items. In this release Oracle Purchasing has built an integration with the Oracle Advanced Pricing product. Oracle Advanced Pricing provides a set of tools in the form of price lists, formulas and modifiers to model complex pricing scenarios. This integration may eliminate the need for existing Oracle Purchasing customers to incorporate custom code into the product in the form of the custom pricing hook.
The integration with advanced pricing allows dynamic calculation of prices providing significant additional flexibility to complement the existing blanket agreement functionality. Companies can now accurately price all requests and purchases, thus reducing their dependence on the supplier’s billing capabilities.
Pricing Hierarchy
• If the transaction references an item from the item master, the list price of the item in the item master is first defaulted into the transaction.
• If the transaction references an approved and active blanket agreement, the pricing engine then determines the price from the applicable agreement price breaks if there’s any.
• If there isn’t any price break defined, it picks up the price from the agreement line.
• If there’s pricing information available in Oracle Advanced Pricing in the form of price list lines and/or modifiers, these pricing rules are then applied to arrive at the net price.
• It is important to note that if you have defined custom pricing rules in the custom hookprovided, those rules override any other pricing that the system may have derived.
·Mass Re-pricing of Purchasing Documents was availabel from 11i9, in R12 it is improved a lot.You can now be able to re-price orders in batch using the existing “Retroactive Price Update” concurrent program even if the orders were not sourced from Blankets.
This Concurrent Program is now capable of re-pricing transactions based on pricing rules defined:
oOn Oracle Advanced Pricing Price Lists/Modifiers
oAnd on Custom Pricing Hooks
·Advanced Approval Support for Requisitions:
oParallel Approvals
oSupport for Viewers
oPosition Hierarchy Support
·
·

Requisition templates (Create and Use)

$
0
0

Many times requisitions have common/standard set of item depending on user or department, so better to use template for such kind of requisition. Then user can just create requisition by using the templates without missing any component/s.

These templates automate requisitioning of commonly ordered items like office supplies. To create a requisition for office supplies, requestors in organization simply use template and enter the quantity of each item they want to order.

The Source type determines the source of the requisitioned items. The choice you have in this field is dependent on your user profile options and the system profile options. At either level, you may be restricted to one of the following options: Inventory or Supplier.

Note that if you have both options, you can source requisition lines independently of the requisition type. You can even mix inventory and supplier sourced requisition lines in the same requisition. Purchasing creates one internal sales order for each inventory source type requisition line on this requisition. The supplier source type requisition lines go onto purchase orders, either automatically with AutoCreate Documents or manually with the Purchase Orders window.

Here we are going to see how to create template and how to use it while creating Requisition.

Purchasing Super User (R) > Setup > Purchasing > Requisition Template

Enter the line details on template, if you want to copy content from PO or requisition click on Copy (B).

To create a template, we can specify the items individually or can reference an existing requisition or purchase order. If referring an existing document, Purchasing adds all lines on the document to the template. Multiple documents can be referred to add all their lines to the same template. You can place lines from multiple documents onto the same requisition template.

Note: For supplier-sourced lines, you can enter the unit price, and this price is used in the Requisitions window. For inventory source lines, the cursor does not enter this field, and the price in the Requisitions window is the actual cost from inventory. You can enter sourcing information for the current line in the lower part of the screen.

After copying content from document you can modify those on template as well as add and remove few lines if required.

Save your work now.

After you define a template, you can reference the template in the Supplier Item Catalog. When you do so, Purchasing displays all template lines that are valid for the destination organization, and you can use any of these lines on your requisition. Go to Purchasing (R) > Supplier Item Catalog and query for the template, then go to ‘Requisition Template’ (T).

Now we will see how you can create Requisition using template.

Go to Purchasing (R) > Requisitions > Requisitions

Then enter header level information and come to line and click on ‘Catalog’ (B). Again query for the template you want to use.

Here you can add or remove line to requisition from the template. After completing click on ‘Select’ (B).

All the selected lines get copied to requisition automatically. Here also you can add more line to requisition if required.

Rest of the process of approval and creating PO remains same as any other requisition.

Multi-Org Access Control - Understanding

$
0
0
Now in Release 12, Multi-Org Access Control (MOAC) enables companies that have implemented a Shared Services operating model to efficiently process business transactions by allowing users to access, process, and report on data for an unlimited number of operating units within a single application’s responsibility.

This increases the productivity of Shared Service Centers as users no longer have to switch application responsibilities when processing transactions for multiple operating units.  Data security and access privileges are still maintained using security profiles that will now support multiple operating units.


The question is how it is possible in R12 and not in 11i...

ANSWER is the Virtual Private Database (VPD) enables data access control by user or by customer with the assurance of physical data separation. This feature came in Oracle 10g  databse.

Base data tables exist in the product schema with a naming convention of %_ALL.  The data in this table is striped by ORG_ID (Operating Unit).
To view this info in APPS schema user use to use some VIEWs based on evirnmental variable.

In R12 these kind of VIEWs are phased out and  SYNONYMs came in...

e.g.
In 11i therer was a view OE_ORDER_HEADERS in APPS schema which use to retrive / show information base on below SQL statement.
SUBSTRB(USERENV ('CLIENT_INFO'), 1, 10)


....................................................................................................................................................
Now in R12 synonym in the APPS schema provides the Multi-Org filtering based the Virtual Private Database feature of the Oracle 10G DB Server.


For more technical knowledge please refer www.norcaloaug.com/seminar_archive/2009.../4_01_peters.ppt


In Release 12, you can create a Security Profile and assign as many operating units as you want to that security profile.

Multi-Org Access Control Setup:
-

Using Oracle HRMS, you can define your security profile using two forms:
  • The Security Profile form, which allows you to select operating units from only one Business Group
  • The Global Security Profile form, which allows you to select operating units from multiple Business Groups

Also it can be done by creating organization hierarchies to show reporting lines and other hierarchical relationships. If you want to include organizations from a single Business Group, use the Organization Hierarchy window, alternatively, use the Global Organization Hierarchy window to include organizations from any Business Group. Always define hierarchies from the top organization down.


After doing these setups or modification in security profile, run a concurrent request called “Security List Maintenance” from HR which makes those security profiles available and allows you to assign them to a responsibility via a profile option called “MO: Security Profile”

1. The MO Security Profile controls the list of operating units that a responsibility or user can access. If you set the security profile at the responsibility level, then all users using that responsibility will have access to only the operating units available in the security profile.
If you set the security profile at the user level, then the user will have access to only those operating units, irrespective of application responsibility that they log into. User level security profile over rides, security profile assigned at other levels.

2. The MO: Default Operating Unit is optional and allows you to specify a default operating unit that defaults when you open different subledger application pages. Because you can access multiple operating units, you may want to set up a default one instead of forcing users to constantly have to choose one. User Preferences allows you to specify a default operating unit at the user level. Use the MO: Default Operating Unit profile option to set the operating unit context or default operating unit when accessing an applications.

3. The last profile option is for backwards compatibility and to support products that do not use Multiple Organizations. The release 11i setting was for this is preserved during upgrade. The Release 11i MO: Operating Unit profile option is supported in Release 12 as not all customers of Oracle products require multiple organizations.


Multi-Org Access Control Process:


CASE:
Within a Business Group “Vision Corporation”  we need to give access to Multiple Operating Unit through one responsibility, base on conditions. MOAC going to help in this.

For one particular responsibility called “DG- Purchasing SuperUser” there is a requirement of having access to multiple Operating Units listed below:
  • Vision Construction
  • Vision Corporation
  • Vision Operations
  • Vision Services

Due to many other requirements one hierarchy “DEVendra- Org Hierarchy” exists with the structure as show below.
  • Vision Corporation
    • Vision Operations
    • Vision Services
    • Vision Utilities
In this case we can define one security profile “DEVendra- Security Profile”, use existing hierarchy and include one more OU “Vision Construction” also exclude “Vision Utilities”.

As this is the requirement with in Business Group, Organization Hierarchy and Security profile will serve the purpose. Had it been a requirement across Business group, we would have gone for Global Organization Hierarchy and Global Security profile.

NOTE: The case we are going to consider is hypothetical and the numbers of Operating Units are only 3-4, in practical it could be much more. So just imagine if a hierarchy has 50 OUs list and only 2 OUs needs to excluded / included for one of requirement… this consideration will give better understanding of this demo…

Check / Create a Hierarchy:
HRMS Manger (R) > Work Structures > Organizations > Hierarchy


Create a Profile:
HRMS Manger (R) > Security > Profile

Enter a name, and select the Security Type called “Secure organizations by organization hierarchy and/or organization list”. This allows you to assign multiple OUs.

NOTE: Optionally use the next two steps to enter a list of Operating Units instead of a Hierarchy or to add additional Operating Units to the list included in the Hierarchy.

Enter Classification: Operating Unit and Organization Name.


This will give access to “Vision Construction” as well as all OUs in the attached hierarchy excluding “Vision Utilities”. Hence the purpose mentioned in this case will get solved.

Run the Security Maintenance List program
Name : Security Maintenance List
Parameters: Generate list for... All Security Profiles

Create a customized responsibility
System Administrator (R) > Security > Responsibility > Define
.


Assign the security profile
System Administrator (R) > Profile > System


Assign the responsibility to your user
System Administrator (R) > Security > User > Define

Test the MOAC Setup whatever we did here...

Login > DG- Purchasing SuperUser (R) > Purchase Order > Purchase Order
Check LOV in the Operating Unit field to see the list of Operating Units that can be accessed.


Note: If the pictures have bad visibility please CLICK HERE

Inventory Transaction data flow

$
0
0
Inventory Transaction Tables
This article will help to understand table structure which supports material  transactions in Oracle E-business suite (R12). 


       MTL_TRANSACTIONS_INTERFACE: This is the interface point between non-Inventory applications and the Inventory transaction module. The Transaction Manager concurrent program polls this table at a user-specified process interval and submits the transaction workers to process them. Processing consists of data derivation, validation, and transfer of records from MTL_TRANSACTIONS_INTERFACE, MTL_TRANSACTION_LOTS_INTERFACE, and MTL_SERIAL_NUMBERS_INTERFACE into their respective TEMP tables, from where they are processed by the transaction processor.


       MTL_MATERIAL_TRANSACTIONS_TEMP: This table is the gateway for all material transactions. Records are processed from this table into Inventory through the transaction processor. All Inventory transaction forms write directly to this table. Outside applications must write transaction records to MTL_TRANSACTSIONS_INTERFACE TXN Processor makes use of TXN worker to process the transactions from MTL_TRANSACTIONS_INTERFACE to MTL_MATERIAL_TRANSACTIONS_TEMP and from MTL_MATERIAL_TRANSACTIONS_TEMP to MTL_MATERIAL_TRANSACTIONS..

       MTL_MATERIAL_TRANSACTIONS: This table stores a record of every material transaction or cost update performed in Inventory. Records are inserted into this table either through the transaction processor or by the standard cost program. The primary key is TRANSACTION_ID.


       MTL_TRANSACTION_ACCOUNTS: This table holds the accounting information for each material transaction in MTL_MATERIAL_TRANSACTIONS. Oracle Inventory uses this information to track the financial impact of your quantity moves.


Item Reservation- (InSide View)

$
0
0
This article will help to understand table structure which supports Item reservations in Oracle E-business suite (R12).
Item Reservation Tables
  • MTL_DEMAND : This table stores demand and reservation information used in Available to Promise, Planning, and other manufacturing functions. Four row types are stored in this table:
-                 Summary Demand rows
-                 Dependent Demand rows
-                 Open Demand rows
-                 Reservation rows
-                 The primary key is INVENTORY_ITEM_ID, DEMAND_SOURCE_TYPE, DEMAND_SOURCE_HEADER_ID, DEMAND_SOURCE_LINE (o), DEMAND_SOURCE_DELIVERY (o), COMPONENT_SEQUENCE_ID (o).
  • MTL_SALES_ORDERS : This table stores the Oracle Inventory local definition of sales orders and maps sales orders between Oracle Inventory and other Oracle Manufacturing applications. The primary key is SALES_ORDER_ID.
  • OE_ORDER_HEADERS_ALL : This table stores header information for orders in Oracle Order Management. The primary key is HEADER_ID.
  • OE-ORDER_LINES_ALL : This table stores information for all order lines in Oracle Order Management. The primary key is LINE_ID.
  • GL_CODE_COMBINATIONS : This table stores valid Accounting Flexfield segment value combinations for each accounting flexfield structure within your General Ledger application. Available material can be reserved against a valid Accounting Flexfield combination. The primary key is CODE_COMBINATION_ID.
  • MTL_GENERIC_DISPOSITIONS : This table stores the user-defined account alias. An account alias provides a method to use accounting numbers and makes it easier to transact account issues and receipts. Available inventory can be reserved against an account alias. The primary key is DISPOSITION_ID, ORGANIZATION_ID.
  • MTL_MATERIAL_TRANSACTIONS : This table stores a record of every material transaction or cost update performed in Inventory. An issue transaction to an account number or account alias can relieve a reservation against the account number or alias. The primary key is TRANSACTION_ID.
  • MTL_DEMAND_INTERFACE : This table is the interface point between non-Inventory applications and the Oracle Inventory demand module. Records inserted into this table are processed by the Demand Manager concurrent program.
  • MTL_SYSTEM_ITEMS_B : This table is the definition table for items. This table holds the definitions for inventory items, engineering items, and purchasing items. The primary key for an item is the INVENTORY_ITEM_ID and the ORGANIZATION_ID.

Material Status Control in R12 Oracle Inventory

$
0
0
           Material Status control restricts the movement and usage of portions of on-hand inventory. Using material status control enables you to control whether you can pick or ship an internal order or sales order, or issue material for a work order. You can also specify whether material needs to be quarantined until you inspect it. In addition, you can determine whether products with a particular status can be reserved, included in available to promise calculations, or netted in production planning. You assign material statuses at four levels:
  • Sub-inventory
  • Locator
  • Lot
  • Serial Number

           Item status drives the item attributes by allowing you to keep an item from being built in Oracle Work In Process, ordered, procured etc. Material status is a granular control over each inventory transaction that applies to specific material within your warehouse or manufacturing facility

Material Status Control Levels:

           You assign subinventory and locator statuses in the subinventory and locator windows. The location status applies to the material in the location and not the location itself. To assign a material status to a lot or serial, you must first enable the item attributes Lot Status Enabled, and Serial Status enabled on the item in the Item Master. You can also optionally assign a default lot or serial status to an item on the Item Master. When you receive the item, the system automatically assigns the default lot or serial status to the item. The lot or serial status remains the same through all inventory transactions including organization transfers. If necessary, you can change the material status at receipt, use the material workbench, or mobile status update page to modify the material status.

  
            When a material status is assigned to a subinventory or locator, the material is not assigned the material status of the subinventory or locator; rather, it takes on the behavior indicated by the material status at the subinventory or locator level. i.e. Material Status is not directly assigned to Material, it is assigned to subinventory / locator / lot / serial and then Material is assigned to subinventory / locator / lot / serial. This way Material and Material Status are indirectly tagged to each other.


Cumulative Effective Status: 
            A cumulative effective status is the combination of all disallowed transactions. Disallowed transactions and planning actions are cumulative.

           When you transact an item, the system checks all of the material statuses. If the system finds a status that disallows the transaction, whether at the serial, lot, locator, or subinventory level, then the transaction fails.

           For example, if you have a locator whose status disallows WIP Issue and that locator is in a subinventory whose status disallows Sales Order Issue, neither of those transactions will be allowed for material that is in the locator


1. Enable Status Control for the Transaction Type :

We have to set Profile option INV: Material Status Support = Yes
  • If you do not enable status control for a transaction type, then the transaction type is always allowed


2. Define Material Status Code :


3. Attach Material Status Code to Sub-inventory / Locator / Lot / Serial : 
Here we are attaching it to Locator.

As we defined Status code for Usage at Locator and Lot level, this can be used only for Locator or Lot


What’s new in R12- Inventory Management

$
0
0
R12 Oracle Inventory Management, New Features

==========================================================
• Changed Features in R12 Inventory
----o OPM Inventory conversion.
----o Material traceability: Enhanced material control
----o Dual UOM functionality.
----o Material Status control.
----o Advanced Lot control.
----o Lot indivisibility functionality.
----o Material aging workflow.

• OPM Inventory Convergence
----o Structural changes in Inventory Organization
----o Benefits of OPM Inventory convergence

• Changed features for Inventory Process Convergence
----o Oracle Process Inventory Obsolescence
----o OPM Functionalities are supported by Oracle Inventory
----o New features pertaining to OPM
-------- Dual unit of Measure control
-------- Material status control
-------- Advanced Lot Control
-------- Support for Indivisible lot
-------- Material Aging workflow.

• Oracle Process Inventory Obsolescence: Before


• Oracle Process Inventory Obsolescence: After


• Advantages: Oracle Process Inventory Obsolesces
----o Single Item Master to be maintained.
-------- Process Attributes are added to Item definition
-------- Dual quantity tracking for item.

----o Combined view of Inventory
-------- On-Hand balance in one application
-------- Inventory transacted by one system

----o Integrated Supply Chain
-------- Seamless integration to other products like WMS & MSCA available to Process users.


• Advantages: Oracle Process Inventory Obsolesces
----o Dual Units of Measure control
----o Material Status control
----o Advanced Lot control
----o Lot Indivisibility
----o Material Aging Workflow


• Inventory tracking in Dual Units of Measure
----o Explanation
----o Set up and Process
----o Dependencies and Interactions.
----o Even without constant conversion, quantity can be tracked in two Units of Measures.
----o Transact, reserve, check on-hand and availability in multiple Units of Measure.
----o For Planning and Costing, Primary Units of Measure is used.


• Dual Units of Measure: Set up
----o Define Tracking for Single or Dual UOMs Specify defaulting logic for secondary UOM


• Dual Units of Measure control:
----o Transaction Enter Secondary Quantity at Receipt and all subsequent transactions


• Dual Units of Measure control: On-Hand material
----o View on hand and availability in both UOMs


• Dual Units of Measure control: Dependencies and Interactions
----o Oracle Receiving, Shipping Execution, Order Management, Inventory, WMS and the process manufacturing modules will honor dual UOM
----o If another module in e-Business suit or third party application posts a transaction to inventory via transaction open interface that does not indicate

the secondary quantity, the default conversion is used.


• Enhanced Material control by Material Statuses
----o Introduction
----o Set up and processes
----o Dependencies and Interactions
----o Material Status
-------- List of Allowed and Disallowed transactions
-------- Determination of whether or not the product is nettable, Reservable & ATP-able.

----o Applied to Lot, Serial, Sub inventory & Locator
-------- Assigned at receipt of new lot or serial
-------- Assigned in Sub inventory and Locator forms
-------- Disallowed transactions and planning actions are cumulative
-------- Location status applies to material in location and not Location

----o Update status in material workbench or mobile status update forms
----o Status change history report
----o View On-Hand balances by Material status.


• Set up required to enable Material Status:


• Material Status control setup: Enable Transaction
----o Specify which transaction types can be restricted by status


• Material Status control setup: Define Status code
----o Specify planning attributes for material status Specify allowed and disallowed transactions for this material status


• Material Status control setup: Enable Item
----o Enable status control selectively for Items


• Material Status Control Process- Perform Transaction
----o Status restrictions enforced during transactions
-------- Transactions prohibited by status at any level will not be allowed.
-------- Material will not be allocated for transaction not allowed to complete.


• Material Status Control: Dependencies and Interactions
----o Oracle Receiving, Shipping Execution, Advanced Planning and Scheduling, Inventory and Process manufacturing modules will honor material status.
----o If another module in e-Business suit or third party application posts transaction to inventory via transaction open interface that violated material status restriction, that transaction will be allowed.


• Improved Lot Traceability
----o Additional Lot attributes
-------- Grade, Origination, Retest Date, Expiration Action Code, Expiration Action Date, Maturity Date, Hold Release Date.

----o Sub-Lot tracking
----o Lot-level UOM conversions
----o Indivisibility of Lots


• Additional Lot Attributes:
----o Grade, Origination, Retest Date, Expiration Action Code, Expiration Action Date, Maturity Date, Hold Release Date.
----o Grade attributes allowed for allocating a particular grade of material for specific customer or order.
----o Expiration action code allows for particular action to be taken on material when lot has expired.


• Sub-Lot tracking:
----o Sub-Lot: A lot with parent
----o Sub-Lot numbers & Parent numbers can be generated at receipt.
----o Search for material by Lot or Sub-Lot.
----o Automatically name lots as a concatenation of parent lot and sub-lot name.


• Sub-Lot Track: Set up
----o Enable Sublot Control on Item Master


• Sub-Lot track: process
----o Parent Lot number entered during transaction for sublot controlled Items


• Lot level UOM Conversion:
----o Conversions can be created or modified for specific lots
----o Lot level conversions automatically stored as a part of initial receipt transactions for item.
----o Update conversion for the lot and automatically adjust on-hand balances accordingly.
----o View lot level conversions in lot maintenance form


• Lots Indivisibility:
----o Need for Lot Indivisibility
----o Item attribute to determine Indivisibility
----o System will over or under allocate accordingly so that only full lots are chosen
----o Indivisible lots may be manually split, but other transactions for partial quantities are prevented
-------- Exception for receipt into same locator and miscellaneous issue


• Lot Indivisibility: Set up
----o ‘ Lot Divisible’ flag indicates whether lots of this Item can be divided


• Management of Aging of Material
----o Material aging workflow: allows user to be notified about specific date attributes of lot or serial.
----o Concurrent Request: Designed to take action on any date attributes.
-------- The date attributes usually are Expiration date, retest date, maturity date or other types of dates.

----o Workflow is initiated when the given date attribute is within the given number of days of current date defined in concurrent request.
----o Default workflow sends notification, but can be customized to support any functionality.


• Lot Genealogy Enhancement:
----o The enhancement is incorporated in the lot genealogy form to allow user to:
-------- Highlight a particular item lot on a genealogy tree
-------- Toggle between the tabs like ‘where used’ & ‘source’ using highlighted item lot as a top node in the tree.
-------- Refresh the tree with different top level nodes without being forced to go back to query window
-------- View more level of details in the left side navigator where lot branches are expanded before they are forced to scroll horizontally.


• Summary
----o We have learnt about:
----o OPM inventory conversion
----o Dual UOM functionality
----o Material Status control
----o Advanced Lot control
----o Lot Indivisibility
----o Aging of material
----o Lot Genealogy Enhancement


*NOTE: This article is not completely prepared by me, content is edited and complied after referring various sites

Manual / Online Discount at Order Line level

$
0
0
Based on few leading practices of industries user shall not be able to change list price on order directly. Some or the other justification has to be given. The changes has tobe based on some conditions e.g. Customer / Item / Location etc. Oracle does not allow to change price directly on order line.

 
In many case user want to change the price on Sales Order line directly without going to some other window and then put some entries. In this case we need to do some setup which enables this functionality, which is called as “Manual / Online Discount”

 
Below are the steps needs to be done to enable Manual / Online Discount at Order Line level:
  1. Define one Manual Modifier List (uncheck Automatic at header level), although it not mandatory at header level.
  2. Select Header type as "Discount List"
  3. Define one Manual Modifier line (uncheck Automatic at line level) Required
  4. Select checkbox for field ‘Override’ (in Modifier Summary Tab)Required
  5. Select appropriate ‘Pricing Phase’ (in Modifier Summary Tab)
  6. Select ‘Product Attribute’ and ‘Product Attribute Values’ is you want to restrict this to specific cases only.
  7. Populate the field ‘Application Method’ with appropriate value.
  8. Populate either of ‘Values’ or ‘Formula’ field.
  9. If you have any other condition to restrict use of online discount, then use the other field as well as you can use Qualifier to enable extended conditions / filter.
  10. Run ‘Build Attribute Mapping Rules
  11. Now User must be able to change to price column value directly on Sales Order form.
  12. If multiple modifiers exist for manual application, then one pop-up opens showing all eligible modifier and user need to select the desired modifier. (No pop-up in case of single manual modifier)


Pre-Payment Receipt Creation Setups and Process Steps

$
0
0
This post is exclusively shared by Mr. Sidhartha Anireddy (Oracle Finance expert).

Setups Overview

The following setups are required for the purpose of being able to create a Prepayment Receipt for a customer from Order Management.
1          Update OM System Parameters
2         Define Customer Bank Account
3         Define New Payment Method (Optional)
4          Define Receivable Activity
5          Define Payment Terms
6          Assign Bank Account to Customer Site
7          Define/Assign Document Sequences


Process Steps Overview


Please follow the following steps to:-
-          Create a Prepayment Automatic Receipt from Order Management
o   Enter and Book Order
o   Create & View Prepayment Receipt
o   Ship Order
-          Apply the Receipt to An invoice created from the Order
o   Run Autoinvoice Program
o   Review the Receipt and Accounting Entries


1.     Update OM System Parameters

Navigation > Order Management Super User > Setup > System Parameters > Define
Define the system parameter if it is not defined. Query it, enable ‘Allow Multiple Payments’ and click on OK
Navigation > Order Management Super User > Setup > System Parameters > Values
Enter the name of the Operating Unit name and enable the “Show All” check box. Place your cursor in the field “Parameter” and query for “Allow Multiple Payments”. If the value for this parameter is not set to “Yes” update the value to “Yes”. The setup change once made cannot be updated later. Please refer the below screen shot.

2.     Define Customer Bank Account

Navigation >   Payables Super User > Setup > Payment > Banks
If the Bank is already created, query for the bank and click on the Bank Account button. Click on the new button from the menu options and enter the following fields
(a)    Bank Account Name
(b)   Account Use – Should be “Customer”
(c)    Bank Account Number
(d)   Currency – The default currency will be currency of the set of books assigned to the operating unit from which you are trying to create the bank account.
(e)   Save the record after entering the above information. Please refer the below screen shot.

3.     Define a New Payment Method


A new payment method is required if you wish to use the Credit Card Payment Type when creating the prepayment receipt from Order Management. If any other payment type is to be used from Order Management for creation of Prepayment Receipt a new Payment Method is not required to be created. However if you wish to create a new payment method for any other reason please follow the steps mentioned below.
Navigation >   Receivables Super User > Setup > Receipts > Receipt Classes
I have used an existing Receipt Class and only created a new Payment Method. Query for the payment method “XXX Manual Receipts” and place your cursor in the “Payment Method Name” field and click on new button from the menu options. To create a new payment methods enter the following detail:-
(a)    Payment Method Name
(b)   If you want a different name to be printed then enter a different name in the “Printed Name” field. Please refer the below screen shot.
(c)    Click on Bank Accounts and assign an internal bank account. The effective dates in the bank account default to the current system date. If you are entering back dated transactions when testing please ensure that this date is changed accordingly. Enter all the required information if it does not default from Bank Account Setup. Please refer the below screen shot.
(d)   Save the record, the new payment method is created.

4.     Define Receivable Activity


For creating automatic receipt from Order Management a new Receivable Activity of type prepayment has to be created. Accounting entries will also be generated using the account assigned to this Receivable Activity. You can define as many prepayment receivable activities as you want. Only one prepayment receivable activity can be active at any point in time. The accounting entries that get generated in the process are also provided elsewhere in this document.
Navigation >   Receivables Super User > Setup > Receipts > Receivable Activity

5.     Define Payment Terms


There should be at least one payment term which has the “Prepayment” check box enabled. If a payment term is already available then skip this step else create a new payment term or update an existing payment term. When testing we may have to manually enter the payment term in Order Header. However when we move the solution to Production we can agree on a process of defaulting the Prepaid Payment Term on Order Header
Navigation >   Receivables Super User > Setup > Transactions > Payment Terms
Please refer the screen shot below.                               

6.     Assign Bank Account to Customer Site

Navigation >   Receivables Super User > Customers > Standard
Assign the bank account created in #2 above to the customer site. Enable the Primary check box in the bank accounts window and ensure that the effective date is earlier than the date when you want to process transactions. Please refer to the screen shot below.

7.     Define/Assign Document Sequences


If a new payment method is created then document sequences have to be defined and assigned for the new payment method. In my process steps I have not defined a new sequence; hence I am referring directly to assigning of document sequences. Document sequence is an important step since the receipt number will be same as the document sequence number assigned to Prepayment Receipt.
Navigation > System Administrator > Application > Document > Assign
Enter the following information to complete the assignment of document sequences to the payment method:-
(a)    Application – Enter Receivables
(b)   Category – Enter the name of the new payment method created. If a new payment method is not created then ensure that the payment method that you are using has a document sequence assigned to it.
(c)    Set of Books – Enter the name of the new set of books associated with the operating unit where you would be entering transactions.
(d)   Method – Assign the document sequence to both manual and automatic methods.
(e)   Start Date – The start date entered here should be earlier than the date on which you wish to perform transactions.
(f)     Sequence – Enter the name of the sequence that would be generating numbers for your payment method. Please refer to the below screen shots.
Document Sequence Assignment – Document Tab

Document Sequence Assignment – Assignment Tab

Process Steps

1.     Enter and Book Order

Navigation > Order Management Super User > Orders, Returns > Sales Order
Enter the following information to create and book the order:-
(a)    Customer Name – Enter the name of the customer for whom the bank account was assigned in the setups.
(b)   Navigate to Other tab on Order Header and change the payment term to the new payment defined in #5 above.
(c)    Enter the order lines and book the order.

2.     Create & View Prepayment Receipt

After the order is booked click on Actions button on Order Header. From the list of values choose payment. The payment window will open. Follow the below steps to create a prepayment receipt
(a)    Enter the Payment Type as Cash.
(b)   Enter the Percent as 100 to create a receipt equal to the Order Header Amount.
(c)    Enable the Prepay Check box.
(d)   Scroll towards the right side using the scroll bar and choose the receipt method.
(e)   Click on Process Payments. This will call the Prepayment Receipt Creation API to create the receipt.
(f)     Click on View receipt to view the Prepayment Receipt.

3.     Ship Order

Navigation > Order Management Super User > Release Sales Order > Release Sales Order.
Enter the sales order number which has to be released. After releasing the sales order ship confirm and submit the workflow background process to interface Order to Receivables.

From Receivables responsibility submit the Autoinvoice program for the order. The “Prepayment Matching Program (Prepayments Matching Program)” will automatically get fired. This program applies the prepayment receipt to the invoice that gets created by Autoinvoice program.

Receipt Accounting Entries when the Receipt is created.

Cash A/c                                                               Dr.
Unapplied Receipts A/c                                 Cr.
Unapplied Receipts A/c                                 Dr.
Prepayment A/c                                                Cr.

Accounting Entries when the receipt is applied to an Invoice by the Prepayment Matching Program.

Prepayment A/c                                               Dr.
Unapplied Receipts A/c                                 Cr.
Unapplied Receipts A/c                                 Dr.
Receivables A/c                                                 Dr.


How to apply Credit Hold on Sales Order even before Booking the order

$
0
0
We can put all the Sales orders on Credit Check hold for a customer before booking the order.
Open customer details, go to 'Profile: Transaction' tab and enable a check box 'Credit Hold'.


This option is available at Customer level as well as Customer site level, you can use whatever applicable.


Credit Check Hold re-evaluations

$
0
0

 If the exposure of a customer is more than the credit limit, then the sales orders for that customer goes on Credit Check Hold at the time of booking. Many time business need to change the credit information of customer of group of customers, even after increasing credit limit earlier booked order remains in Credit Hold. In this case re-evaluation of credit information on sales order for a customer or group of customer needs to be done again.  Or say customer paid for some of the earlier orders and now few new orders needs to process which were on hold.

                In all the above cases a person need to find all the orders which has hold and need to release hold manually after verifying the credit details. During do this activity human error may come or it may take more time in case there are plenty or orders pending. So Oracle has given a concurrent program (Credit Check Processor) using which you can automatically release order or order line credit holds when a customer's credit exposure has been reduced to a point that enables credit checking validation to pass successfully.

Credit Check Processor program:
The Credit Check Processor program can be run on demand to re evaluate Booked orders that have not been shipped yet.
Use the Credit Check Processor when you suspect that your customers credit exposure has changed and you want to re evaluate their sales order status (releasing or applying credit check holds accordingly).
Also use Credit check Processor whenever you change your customer or default credit set up and you want this changes to immediately take affect in your booked sales orders.
The program only can be used if you run credit checking at Book, only for booked
orders (all orders are booked). So just select the parameters and run the program.


NOTE: Oracle does not have any other method to release credit hold on orders in mass.

Shipped Quantity more than Ordered Quantity ???

$
0
0
If you find a case where Shipped Quantity more than Ordered Quantity, then you may control it using the shipment tolerance setup given below.
Over or under shipment tolerance can be setup at at three levels.

1. Item Level (Highest precedence)


2.Customer Level


3. Profile Option (Lowest precedence): This can be setup at Site level.


Rules for Pick Release

$
0
0

Release Rules
  • Release rules define the criteria to be used during Pick Release. Only orders that meet the criteria and are eligible will be released. An order line is eligible if it has completed the prerequisite workflow activities, such as Schedule - Line or Create Supply.
  • When pick release is run, the pick release is performed based on the parameters set up in the selected pick release rule. For example, you can create a specific rule that pick releases only backordered lines.
    • Note: Although you can also enter the pick release criteria at pick release time without creating a rule, creating a rule is more efficient if you frequently run the same pick release. Also, note that it is required when releasing using SRS or when using the Auto Pick Pack and Ship features
  • This is just for Defaulting purpose, you can change the attribute values at the time of Releasing order


Release Sequence Rules
  • You can define release sequence rules to specify the order in which eligible picking lines are allocated to Inventory during pick release. You can release the picking lines by:
    • Order number
    • Outstanding Invoice Value
    • Scheduled Date
    • Departure Date
    • Shipment Priority
  • You can assign a priority level to one or more attributes with 1 being the highest priority and 5 being the lowest. You can also define whether you want the picking lines released in ascending or descending order.
  • For example, if you select the Ascending button for Order, picking lines are released by ascending order number-- Order 1001 is released first, then Order 1002, Order 1003, and so on. If the Descending button is selected, the picking lines are released by descending Order number from highest to lowest.
    • Note: You can define either the Outstanding Invoice Value attribute or the Order attribute for the Release Sequence Rule, but you cannot select both for the same rule. No two attributes can be given the same priority.
  • Release sequence rules can be edited after creating it, but its name cannot be changed.
  • Release Sequence rules determines the order in which inventory is allocated to sales orders. You choose to allocate by order, outstanding Invoice value, Scheduled Date, Departure Date and Shipment Priority.
  • If a company is dealing with very demanding products and has a problem of running out of material before all of their orders have been filled it is very important that they have filled their most important orders first.

  • This Release Seq rule then assigned in Shipping Parameter form. All the release transactions will be done based on this rule for the particular inventory organization.


Picking Rules
  • Picking rules, which are created and maintained in Oracle Inventory, suggest which material to use, based on inventory controls such as revision control, lot control, FIFO (first in first out) or subinventory/locator picking numbers.

  • Picking rule is an Item Attribute. Create a variety of picking rules and associate them with the appropriate items. If there isn’t a Picking Rule associated with the item, the system will use the organizations default picking rule which is found on the Shipping organizations Parameters.

  • Moreover you can do assignment of this rule based on various conditions…

Pick Slip Grouping Rules
  • Pick Slip Grouping Rules organize how released order lines are grouped on Pick Slips for ease of picking. For Example: By using the Pick Slip Grouping Rule as Subinventory, the user can reduce the number of trips to a particular subinventory by grouping all lines for that subinventory on to one Pick Slip.

  • This Pick Slip Grouping rule then assigned in Shipping Parameter form. Grouping of order line on Pick Slip will be done based on this rule for the particular inventory organization.


Pricing based on quantity range without Price Break feature

$
0
0

Goal
How to setup to make a price list line only eligible to a sales order if the line item quantity is at a certain value or range.

Does not want to use price break header functionality because if the item quantity is not in the range, then the pricing engine should look for a different price list.


Solution
To implement the solution, please execute the following steps:
     1.    Navigate to: Oracle Pricing Manager (R) > Setup > Attribute Management > Context and Attributes
     2.    Query on:
      Type: Pricing Attribute, Code = PRICING ATTRIBUTE, Name=Pricing Attribute
     3.     Add a record as follows:
      Code: DEV_PRC_BRK (any unique name)
      Name: functionalguy.blogspot.com
      Column Mapped:PRICING_ATTRIBUTE7 (select one appropriate for the instance)
      Value Set: QP: Number

     4.    Save the changes done.

     5.    Navigate to: Setup > Attribute Management > Attribute Mapping and Linking
Query: Pricing Transaction Entity = Order Fulfillment& Context Type: Pricing Context
Place the cursor on Code = PRICING_ATTRIBUTE

     6.    Click on 'Link Attributes'
Add a pricing attribute:
      Code: DEV_PRC_BRK
      Level: LINE
      Attribute mapping method: ATTRIBUTE MAPPING

     7.    SAVE the record.

     8.    Click on Attribute Mapping (button) to Enter:
        Application name = Advanced pricing
        Under line level enter:
        User Source Type: PL/SQL API
        User Value String: OE_ORDER_PUB.G_LINE.ORDERED_QUANTITY


     Save the changes done

     10.Run a concurrent program. From the top menu bar, select Tools > Build Attribute Mapping Rules

     11.Now pull up the price list
      Query the price list line for the item (example: AS54888) and add pricing attribute information
 as it will now be available in the list of values.
      Add a second line for this item and the quantity it applies to by entering the
 newly created pricing attribute. Remember, always add a line along with Pricing Attribute and then SAVE the record.


Let’s see the Pricing attributes values in details for each price list line:


     12.Recommended step : Run QP: Maintains the denormalized data in QP Qualifiers
      Responsibility = Oracle Pricing Manager


     13.Test the functionality built so far:
      Responsibility = Order Management Super User (or equivalent)
 
      Navigate: Orders, Returns > Sales Orders
      Enter various sales order lines for this item for the various order quantity ranges or value as setup above to confirm that the unit selling price is coming correct.


Reference:  How to Setup to Make a Price List Line Only Eligible to a Sales Order When the Line Item Quantity is at a Certain Value or Range [ID 414254.1]   

Kanban replenishment cycle

$
0
0

Replenishment Cycle:
There can be four types of Source type (Inter-org, intra-org, Supplier and Production). Depending on Source type replenishment cycle types differ a little bit.
Four types of kanbans are available:
         Inter Org:      Triggers creation of an internal requisition
         Intra Org:      Triggers creation of a subinventory transfer
         Production:   Triggers creation of a discrete job (released status)
         Supplier:       Triggers creation of a purchase requisition (approved status)

 Once Kanban Cards are generated successfully they are ready to use. Generally initial status is kept to be “New” when we replenish the card status changes to “Empty”.

Replenishment Flow for Kanban Cards:


 Supply Status
         New:          kanban just created and not yet part of replenishment chain
         Empty:       kanban is empty and replenishment signal has been generated - impacts Inter-Org and Supplier source types
         Full:          kanban has been replenished and material is available for use
         Wait:          kanban is waiting for minimum order quantity to be met by the aggregation of cards.
         Inprocess:  For the Supplier source type, PO has been approved. For Inter-Org source type, internal requisition has been approved


Example 1 (Source type as “Suppler”):
First we will see how replenishment of item having Source type as “Suppler”. For that I have selected item 2088067
Here for replenishment Purchase Order is generated and sent to supplier.


Let’s see the cards of this item.         


Now we will replenish (click on Replenish button) Card 6487, the Supply status will become ‘Empty’


Now one requisition gets generated, which needs to be imported.

Put Inventory as ‘Import source’ then press OK button and submit the request.


Note down the request number for future reference.
To see the Requisition Summary go to “Purchasing Super User” responsibility.


Put the details of requisition you are searching for e.g. Item number, Date and so on. Then press Find button to get the requisition.


Now go to “Auto Create” to generate Purchase Order for that requisition. To get better search performance note down the Requisition number (in this case 3665).

Put the requisition number (or other details of Requisition) here to get details.


After this new window will open, containing requisition to be converted into Purchase Order.


            Select the requisitions to generate their Purchase order then select ‘Action’ to be taken, ‘Document Type’ and ‘Group’. And click on Automatic.


            Now click on Create button to send the Purchase Order for approval.


Now get in “Purchase Order Super User” responsibility. Now the PO must get approved.

Open PO with PO number in message above and approve it.


            Here we can see the PO status as “Incomplete”. Now click on Approve button. If the assigned buyer has authority to approve the specified quantity / amount, then PO gets approved.


            Now here see the status of PO, it is “Approved”.

When material is received, we have to make a receipt for that particular PO.


            Thus that material is received, this will reflect in inventory also i.e. “On-hand Quantity”. Also the card status become “Full”


Example 2 (Source type as “Production”):
            Now we will see how replenishment of item having Source type as “Production”. For that I have selected item 2088067-01


Now discrete job to full fill this bin has been raise.


Find the item/assembly for which Discrete job order is raised and make it its status as “Release”. If we want we can release this order automatically.

If item has BOM then we can see its components. As well as if the Item has specific Operation Sequence then we can see those after clicking the button “Operations”.


If item has specific operation routing then job has to go through each operation, then only system will allow to complete the job in system.


Here move the job to last operation of routing. So we can complete the job now.


First we will complete only 10 components even order is for 20.

Now the card status becomes “In Process”. 

Again when we will complete the job for remaining 10 units, the card status will be “Full”.


You may want to refer Generic Kanban Information 


Item Orderability Rule in R12

$
0
0
Item Orderability - This is new feature introduced in Oracle R12.1.1.This is the rule that user can define to restrict the items/group of item (Category) that can be ordered from the Sales Order form.

Because of the complex business scenario in the Modern time organization want to control which customer are allowed to order which product.

Consider below scenarios:
• If a company is developing customer specific items, then specific item shall be sold to specific customer only.
• Few products may be banned in specific region.
• Few items may be sold thru specific channel only. Example: Online, Distributors, franchises, Sales Executive etc.

Now Order management Provide a new utility in R12.1.1 to define the rule to restrict the Item to be sold, based on rules, this utility is name as
Item Orderability Rules. It allows user to Order the Item based on the Rules. Item Orderability rules are defined at Operating Unit (OU) Level.


Now let’s have a deeper look at Item Orderability:

Level at which rule can be built:
As of Now Oracle has provided rules to control only at 11 attributes  


01. Customer

02. Customer Class
03. Customer Category
04. Region
05. Order Type
06. Ship To
07. Bill To
08. Deliver To
09. Sales Channel
10. Sales Representative
11. End Customer
Rule can be defined based on any combination of above attributes:
Example:


Suppose one rule is built based on multiple attributes as done in above example:
The OR condition is applicable when evaluating multiple conditions. In the example above, either the ‘Customer Category’ OR ‘Customer’ OR ‘Sales Channel’ is taken into consideration.

Criteria for the rule:
Criteria can be ‘Item’ or ‘Item Category’


If you select Category as a criterion then you will see “Item Categories Codes” from the Category Set which is assigned as ‘Default Category Set’ for Order Entry functional area for that OU.
Example: In our case ‘Order Entry’ has ‘Inv.Item’ category set assigned so we will be able see category codes from ‘Inv.Item’ Category set only.


Item Validation Organization is referred to validate ‘Item + Category’ combination

Generally Available Flag:
We can set up rules to define when an item or item category is generally not available (the Generally Available box is unselected) with the conditions available for that rule. For example, Item X is generally not available, however, since you have set up conditions at the Rule Level, it is available for a particular customer, or region or customer class.
Conclusion:
Generally Available box is unselected: Oracle will allow putting order for Criteria + ruling combination
Generally Available box is Selected:      Oracle will not allow putting order for Criteria + Rule combination

This is illustrated in the example below:

Case 1: Unselect Generally Available

This means, Item ‘AS54999’ is generally not available for all, but you want to sell it to Customer ‘A. C. Networks’ only.

So this rule allows putting order for Customer + Item combination.

Case 2: Select Generally Available


This means, Item ‘AS54999’ is generally available but you do not want Customer ‘A. C. Networks’ to order it.
So this rule does not allow putting order for Customer + Item combination


Effect of “OM: Use Materialized View for Items LOV (Honors Item Orderability Rules)”
If the value of the profile option OM: Use Materialized View for Items LOV (Honors Item Orderability Rules) is set to Yes, then the Ordered Item LOV displays only those items which are based on the rules defined. The Ordered Item LOV is then dynamically populated based on Item Orderability Rules and the current attribute values on the line.

If the value of the profile option OM: Use Materialized View for Items LOV (Honors Item Orderability Rules) is set to No, then the Ordered Items LOV lists all the items of the item validation organization of the current operating unit. This doesn't consider the defined item orderability rules, however if there is a defined rule that prevents the item from being ordered, then an error message is displayed while saving the order. You will not be able to save the order. Below is Simple test case for Item Orderability feature.

Steps to Define the Item Orderability Rule- 

  1. Select the Criteria  (Item or Category. And Generally Available or not)
  2. Select criteria values (Item Number / Category Code)
  3. Select the Rules Level/s (by selecting any combinations of above 11 attributes)
  4. Select Rules Level value.

Dual UoM in Oracle R12

$
0
0

Lets take a case Food industry:

FG Foods Ltd. sell variety of Chicken which can have different weight. The superior quality of a chicken weighs to 4 Pound (on an average) but the deviation can be ±10%. This chicken is purchased on number basis and later it is sold on Number (Each) basis as well as on weight (Pound-Lbs) basis. So here Chicken is getting transacted based on two UOM and FG Foods want to track Qty on both UoM basis.
To satisfy this requirement we need to define an item which can be tracked on two UoM, define converser rate between these UoMs.

Item Definition:


UoM Conversion:
Also define Inter-class conversion that too item specific.
1 Unit = 4 Pound

Transactions:
Lets look at the transaction below, 100 Lbs comes to 25 chickens (as per tolerance), but if it goes beyond the tolerance then Oracle will not accept it.


In this case, based on tolerance defined it will accept values for secondary UoM ±2.5 (10% of 25).
So in below transactions one line is on –ve tolerance and other is on +ve tolerance.


On-hand and Availability:

Miscellaneous Issue:
Lets try doing issue transaction based on only Secondary UoM (Each). Oracle will automatically calculate quantity in other UoM based on the conversion rate.


On-hand Qty:
In above transaction, even though we did not give value in Lbs, Oracle deducted one chicken and 4 Pounds (refer the conversion).
51-1   = 50 Each
200-4 = 196 Lbs


Price List View:
Oracle accepts different price values for different UoM as shown below, and you can sell the product on any UoM.


Sales Order Lines 68097 :
Lets sell this product based on different UoM..
Oracle will pull the price based on UoM you mentioned on the Order line, also it asks to feed the secondary qty as well. But remember the final transaction will happen based on UoM added on Order line and then other qty will be calculated.


Now Process the Order: Book > Pick Release > Pick Confirm > Ship Confirm.


Observe the above shipping transactions,
Line 1.1: even though its showing Secondary Req Qty as 12 actual Secondary Shipped Qty is 11.5 (as per the conversion), as 46Lbs of chicken comes to 11.5 (46/4)
Line 1.2: Here we did not give qty in Lbs, so oracle calculated it based on conversion and populated.
At the end of this transaction the final On-Hand shall as below:
50 - (11.5+12) =  26.5
196 - (46+48)  = 102
Viewing all 35 articles
Browse latest View live